Credit: From Baked To Perfection: Delicious Gluten-Free Recipes, With A Pinch Of Science by Katarina Cermelj (£22, Bloomsbury), out now
Stylist Loves
Classic gluten-free baking recipes, from chocolate cake to blueberry muffins
By Stylist Team
5 years ago
Katarina Cermelj’s new cookbook is packed with lovable baking recipes with a surprising twist: they’re all completely gluten-free.
From basic banana bread to fancy frangipane galettes, our appetite for both making and eating baked desserts has endured throughout the pandemic. But if you’re gluten-free, you’ll know that baking isn’t always straightforward. Replicating your old favourite cakes, muffins and biscuits can be difficult when you’re unable to use standard plain or self-raising flour – and the taste can be seriously underwhelming, too.
But with the right know-how, it’s totally possible to create luxurious gluten-free bakes – as Katarina Cermelj, creator of the allergy-friendly food blog The Loopy Whisk, explains in her new cookbook Baked To Perfection (£22, Bloomsbury). A scientist by day and baker by night, Cermelj has mastered the intricacies of gluten-free baking, and condensed her experiments into simple, tried-and-tested recipes.
Alongside all the usual ingredients and instructions, Cermelj’s book also includes helpful scientific explanations for why her gluten-free recipes actually work. This means that once you perfect a recipe, you can get creative with your own flavour combinations – no compromises required.

Credit: Bloomsbury
Since nothing beats the all-encompassing happiness of warm cake, we have three classic baking recipes from Cermelj’s cookbook to share below.
With a tender crumb and beautifully caramelised crown, Cermelj’s blueberry muffins are the tea break snack of dreams. The peanut butter and jam thumbprint cookies, meanwhile, will satisfy a craving for something crunchy and bring colour to a grey day.
Lastly, anyone who thought Bruce Bogtrotter’s cake in Matilda actually looked pretty good will adore Cermelj’s super moist chocolate cake recipe. With cocoa, melted chocolate and a rich buttercream for a wonderful depth of flavour, we defy you not to smile once you’ve had a slice.
Blueberry muffins
Katarina says: “A perfect blueberry muffin has to be quick to whip up, have a beautifully domed, caramelised top, be absolutely loaded with blueberries, and have a moist, tender crumb. The gluten-free blueberry muffins you’ll get from this recipe tick all those boxes. An extra sprinkling of granulated sugar just before they go into the oven gives them a pretty sparkle, and a sweet crunch as you bite into them.”
Makes 12
Prep time: 30 mins
Bake time: 20 mins
Ingredients
- 280g gluten-free flour blend
- 80g almond flour
- 150g light brown soft sugar
- 2 tsp baking powder
- 1 tsp bicarbonate of soda
- 1 tsp xanthan gum
- ½ tsp salt
- zest of 2 unwaxed lemons
- 130g unsalted butter, softened
- 140g whole milk, cold
- 140g full-fat plain or Greek yoghurt, cold
- 2 eggs, cold
- 2 tbsp lemon juice
- 1 tsp vanilla bean paste
- 180g fresh or frozen blueberries
- 1 tbsp granulated sugar, for sprinkling
Method
Adjust the oven shelf to the middle position, preheat the oven to 190°C and line a 12-hole muffin tin with muffin liners.
Sift together the gluten-free flour blend, almond flour, brown sugar, baking powder, bicarbonate of soda, xanthan gum and salt.
Add the lemon zest and butter and, using a stand mixer with the paddle attachment or a hand mixer fitted with the double beaters, work the butter into the dry ingredients until the texture resembles breadcrumbs.
In a separate bowl, whisk together the milk, yoghurt, eggs, lemon juice and vanilla paste. Add the wet ingredients to the flour mixture and whisk until you get a smooth, thick batter with no flour clumps.
Spoon about 1 tablespoon of the blueberry-free cupcake batter into the bottom of each cupcake liner.
Set aside about 30g of the blueberries to sprinkle over the top of the muffins. Fold the remainder into the remaining batter in the bowl. Divide the batter equally between the 12 muffin liners, filling each to the brim.
Scatter the reserved blueberries on top of the muffins, sprinkle with granulated sugar, and bake for about 20–22 minutes (if using fresh blueberries) or 24–26 minutes (if using frozen), or until an inserted toothpick comes out clean or with a few moist crumbs attached.
Remove the muffins from the tin and transfer to a wire rack to cool.
Storage
Best on the day, but you can keep them in a closed container in a cool, dry place for up to 4 days. If you’re serving on days 3 or 4, reheat in the microwave for 5–10 seconds first.
Put a twist on it
Other berries, such as raspberries or blackberries work well in these muffins, too. Or, try chocolate chip muffins – instead of the blueberries, simply add dark or milk chocolate chips.
Notes
Cold ingredients (including the yoghurt and eggs) help with the formation of the dramatically domed muffin top.
Muffin batter is significantly thicker than cupcake batter, which helps muffins rise and form the characteristic domed muffin top.
This ensures that even if some blueberries do sink slightly during baking, the distribution of the fruit is fairly even throughout the muffins.
Peanut butter and jam thumbprint cookies
Katarina says: “It doesn’t matter whether or not you like PBJ sandwiches, I guarantee you’ll love these thumbprint cookies, with their slightly chewy interior, a crunchy crust of toasted peanuts and the jam centre that adds a pop of colour and sweet tartness.
“While the flavour of these cookies is spot on, it’s their texture where they really shine. To make the cookies even prettier, I prefer to fill mine with jam after baking. Jam tends to spread and bubble during cooking, which isn’t quite as eye-catching as a pretty dollop spooned into cooled cookies.”
Makes 30
Prep time: 45 mins
Bake time: 2 x 16 mins
Ingredients
- 130g natural, unsweetened, smooth peanut butter
- 100g unsalted butter, softened
- 100g light brown soft sugar
- 2 eggs, separated
- 2 tbsp whole milk, at room temperature
- ½ tsp vanilla bean paste
- 200g gluten-free flour blend
- ½ tsp xanthan gum
- ½ tsp salt
- 150g unsalted, raw peanuts, toasted and chopped
- 5–6 tbsp raspberry or strawberry jam
Method
Adjust the oven shelf to the middle position, preheat the oven to 180°C and line two baking sheets with baking paper.
In a bowl, use a wooden spoon or spatula to mix together the peanut butter, butter and sugar until smooth.
Add the egg yolks, milk and vanilla paste, and mix until evenly incorporated.
Sift in the gluten-free flour, xanthan gum and salt. Mix with the spoon or spatula until you get a smooth, soft (but not sticky) dough that can be shaped into balls without cracking or crumbling.
Lightly whisk the egg whites in a small bowl. Place the chopped peanuts in a separate small bowl.
Roll about 1 tablespoon of cookie dough into a ball and roll it first in the egg whites and then in the chopped peanuts. Transfer the peanut-covered cookie ball to a lined baking sheet. Use your thumb or a ½-teaspoon measuring spoon to create a well in the centre. Repeat with the remaining dough to give 30 cookies, placing them about 2.5cm apart on the baking sheets.
One baking sheet at a time, bake the cookies for about 16–18 minutes until light golden brown. Remove from the oven and immediately use the ½-teaspoon measuring spoon to deepen the well, which might have closed up during baking.
Transfer the cookies to a wire rack to cool, then fill each cookie with about ½ teaspoon of raspberry or strawberry jam.
Storage
1 week in a closed container at room temperature
Notes
Using a wooden spoon or spatula (rather than beating with a whisk or creaming) ensures you don’t incorporate too much air into the mixture, which would result in a crumbly cookie that doesn’t hold its shape well.
The egg whites add moisture and the peanuts slow down the rate of heat penetration into the cookies. You can make them without rolling them in egg white and chopped peanuts, if you like, but they’ll need a shorter baking time: reduce it in the next step to 11–13 minutes.
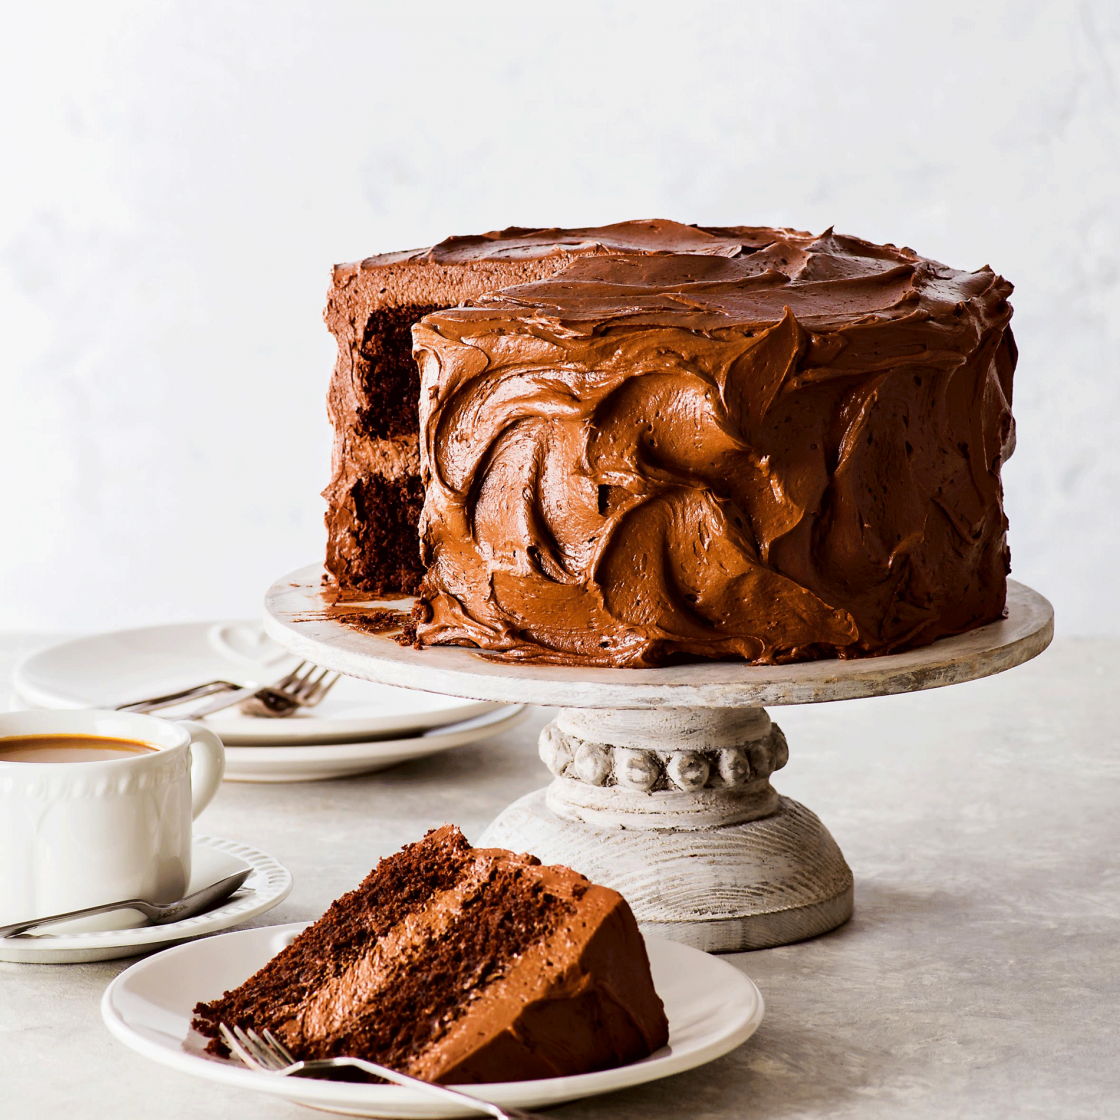
Super moist chocolate cake
Katarina says: “The initial version of this cake relied on only cocoa powder for the chocolate flavour. I won’t lie – it felt like cheating. As delicious the cake was, cocoa powder simply doesn’t match actual melted chocolate when it comes to giving a cake that deep, luxurious chocolate flavour.
“In this improved version, I’ve used both melted chocolate and cocoa powder in the sponges as well as in the frosting – and all of a sudden, it’s become every chocoholic’s dream come true. Because chocolate has a slightly acidic pH, it helps boost the activity of the raising agents and helps makes the sponges even more tender and delicate, without venturing into crumbly, falling-apart territory.
“Don’t be scared by the addition of hot water to the cake batter – together with the milk, it helps keep the cake incredibly moist, so that it simply melts in your mouth.”
Serves 12–14
Prep time: 1 hour
Bake time: 35 mins
Ingredients
For the chocolate sponges:
- 280g dark chocolate (60–70% cocoa solids), chopped
- 200g unsalted butter
- 250g caster sugar
- 4 eggs, at room temperature
- 160g gluten-free flour blend
- 80g almond flour
- 40g Dutch processed cocoa powder
- 2 tsp baking powder
- 1 tsp bicarbonate of soda
- ½ tsp xanthan gum
- ½ tsp salt
- 120g hot water
- 120g whole milk, warmed
For the chocolate buttercream:
- 600g unsalted butter, softened
- 400g icing sugar
- 100g Dutch processed cocoa powder
- ½ tsp salt
- 300g dark chocolate (60–70% cocoa solids), melted and cooled
Method
For the chocolate sponges, adjust the oven shelf to the middle position, preheat the oven to 180°C and line two 20cm round cake tins with baking paper.
In a heatproof bowl above a pan of simmering water, melt the dark chocolate and butter together. Set aside to cool until warm, then add the sugar and eggs, and mix well.
Sift in the gluten-free flour blend, almond flour, cocoa powder, baking powder, bicarbonate of soda, xanthan gum and salt. Mix well until you get a smooth batter with no flour clumps.
Add the hot water and milk. Whisk well until combined.
Divide the batter equally between the prepared cake tins and bake for about 35–40 minutes or until an inserted toothpick comes out clean.
Allow to cool in the cake tins for 10 minutes, then turn out on to a wire rack to cool completely.
For the chocolate buttercream, in a stand mixer with the paddle attachment or using a hand mixer fitted with the double beaters, beat the butter for 2–3 minutes. Sift in the icing sugar and beat for a further 5 minutes until pale and fluffy.
Sift in the cocoa powder and salt, and beat until evenly distributed.
Finally, add the melted and cooled chocolate and beat until you get a rich, smooth chocolate buttercream.
Assembling the cake
If the sponges are domed, level them using a sharp, serrated knife.
Place the bottom sponge layer on a cake stand and spread a generous layer of buttercream on top, but leave enough buttercream for the outside of the cake. Sandwich using the other sponge layer, turned so that its bottom faces upwards. This will give the cake a nice, flat surface for decoration.
Use the remaining chocolate buttercream to cover the outside of the cake. Decorate the cake by creating swirls of buttercream with an offset spatula or the back of a spoon.
Storage
3–4 days in an airtight container or wrapped in cling film in a cool, dry place or the fridge. If you keep the cake in the fridge, leave it out at room temperature for about 15 minutes before serving.
Put a twist on it
Milk chocolate cake – in the sponges, replace the dark chocolate with milk chocolate (for best results, melt the milk chocolate and butter separately), reduce the sugar to 200g, increase the gluten-free flour blend to 240g, and omit the cocoa powder. In the buttercream, replace the dark chocolate with milk chocolate and reduce the cocoa powder to 40g (but add it slowly until you get the desired flavour and colour).
White chocolate cake – in the sponges, replace the dark chocolate with white chocolate and reduce the butter to 160g (for best results, melt the white chocolate and butter separately), reduce the sugar to 150g, increase the gluten-free flour blend to 240g, increase the almond flour to 120g, and omit the cocoa powder. In the buttercream, replace the dark chocolate with white chocolate and omit the cocoa powder.
From Baked To Perfection: Delicious Gluten-Free Recipes, With A Pinch Of Science by Katarina Cermelj (£22, Bloomsbury), out now
Photography: Katarina Cermelj
undefined
By signing up you agree to occasionally receive offers and promotions from Stylist. Newsletters may contain online ads and content funded by carefully selected partners. Don’t worry, we’ll never share or sell your data. You can opt-out at any time. For more information read Stylist’s Privacy Policy
Thank you!
You’re now subscribed to all our newsletters. You can manage your subscriptions at any time from an email or from a MyStylist account.